Exercises 2 - Scripting
In the following exercises, you'll need to reproduce in Typst the image you see. You can freely use the official Typst documentation.
1 - Combining align and stack
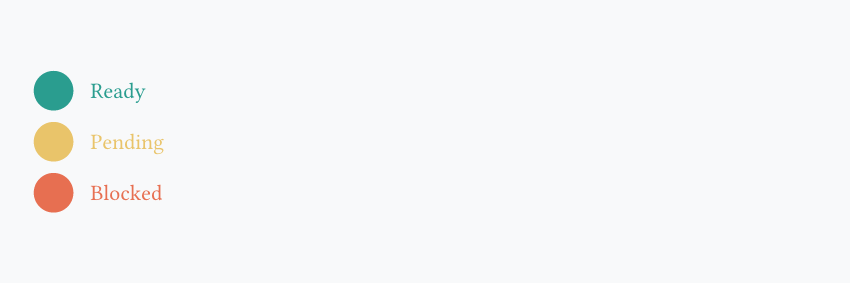
- Wrap your content in
align(horizon, ...) - Build one vertical stack and small horizontal stacks inside it
#align(horizon, stack(
  spacing: 0.2cm,
  stack(
    dir: ltr,
    spacing: 0.3cm,
    circle(fill: rgb("#2a9d8f"), width: 0.7cm),
    text(fill: rgb("#2a9d8f"), "Ready"),
  ),
  stack(
    dir: ltr,
    spacing: 0.3cm,
    circle(fill: rgb("#e9c46a"), width: 0.7cm),
    text(fill: rgb("#e9c46a"), "Pending"),
  ),
  stack(
    dir: ltr,
    spacing: 0.3cm,
    circle(fill: rgb("#e76f51"), width: 0.7cm),
    text(fill: rgb("#e76f51"), "Blocked"),
  ),
))
2 - Create a function with parameters
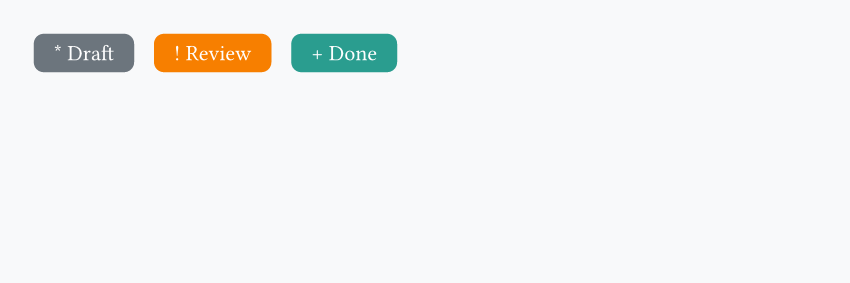
- Define
badge(...)with#let - Give it 2 required parameters (
label,color) - Add one optional parameter with a default value for the symbol before the label
- Call the function multiple times inside a
stack()
3 - Variadic announcement bars
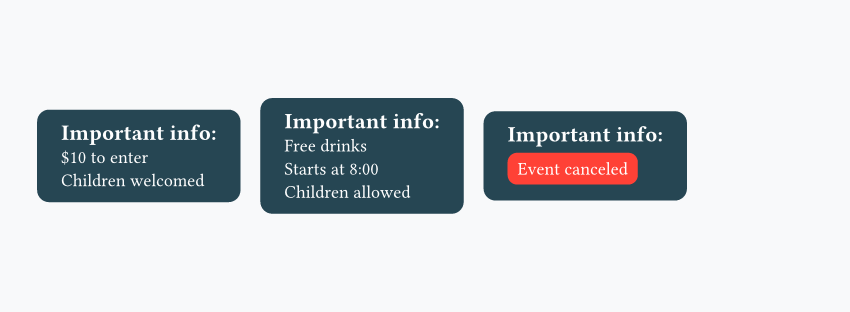
- Define a function with a variadic parameter like
..parts - Put these parts inside a
stack(dir: ltr, ...)
#set text(fill: white)

#let notice(..parts) = {
  rect(fill: rgb("#264653"), radius: 6pt, inset: (x: 12pt, y: 8pt), stack(
    dir: ttb,
    spacing: 0.2cm,
    text(weight: "bold", size: 11pt)[Important info:],
    ..parts,
  ))
}

#align(horizon, stack(
  dir: ltr,
  spacing: 0.35cm,
  notice("$10 to enter", "Children welcomed"),
  notice("Free drinks", "Starts at 8:00", "Children allowed"),
  notice(rect(fill: red, radius: 30%, "Event canceled")),
))
4 - Conditional status labels
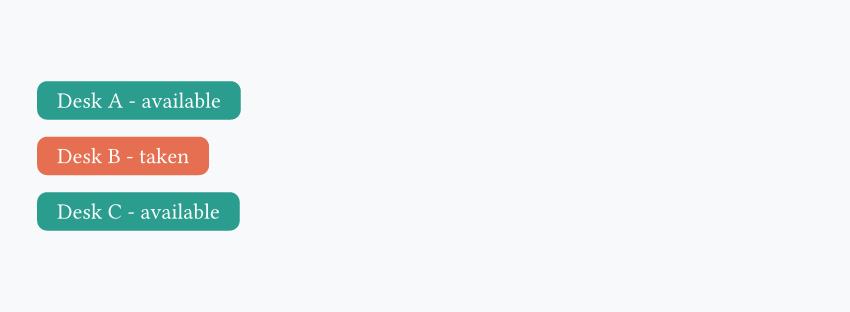
- Define a function with one label argument and one boolean argument
- Use
if/elseto change both the color and the text - Give the boolean argument a default value so you can omit it sometimes
#let desk-status(label, free: true) = {
  let s = if free { [#label - available] } else { [#label - taken] }
  let c = if free { rgb("#2a9d8f") } else { rgb("#e76f51") }
  rect(
    fill: c,
    radius: 5pt,
    inset: (x: 10pt, y: 6pt),
    text(fill: white, s)
  )
}

#align(horizon, stack(
  spacing: 0.3cm,
  desk-status("Desk A"),
  desk-status("Desk B", free: false),
  desk-status("Desk C"),
))
5 - Generate a checklist with a loop
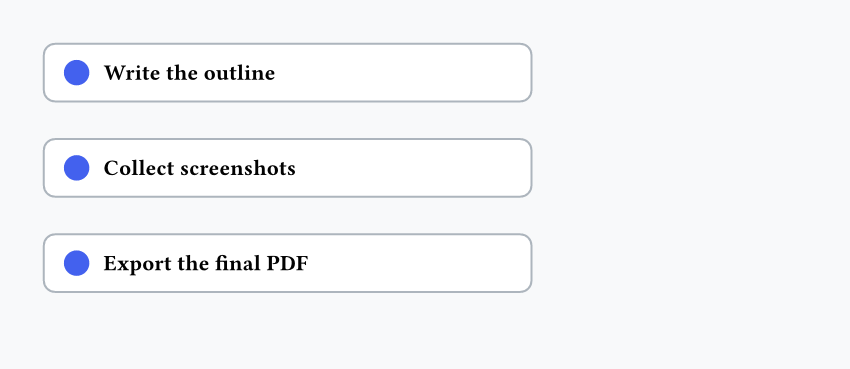
- Create a function that accepts a task name
- Use a
forloop to repeat the same card layout for each item - Add a small
v(...)spacer after each generated card
#let todo(s) = {
  rect(
    fill: white,
    stroke: rgb("#adb5bd"),
    radius: 6pt,
    inset: (x: 10pt, y: 8pt),
    width: 8.6cm,
    align(horizon, stack(
      dir: ltr,
      spacing: 0.25cm,
      circle(fill: rgb("#4361ee"), width: 0.45cm),
      text(weight: "bold", s),
    )),
  )
  v(0.2cm)
}

#let items = ("Write the outline", "Collect screenshots", "Export the final PDF")
#for item in items {
  todo(item)
}
Question
Having questions? Feedback? Feel free to ask!