Exercises 3 - Templating
In the following exercises, you'll need to reproduce in Typst the image you see. You can freely use the official Typst documentation.
Info
In the following exercises, there isn't just one way of doing things! The best way is often the simplest: it minimizes code duplication and makes code reusable and easy to maintain.
1 - Build a small release board
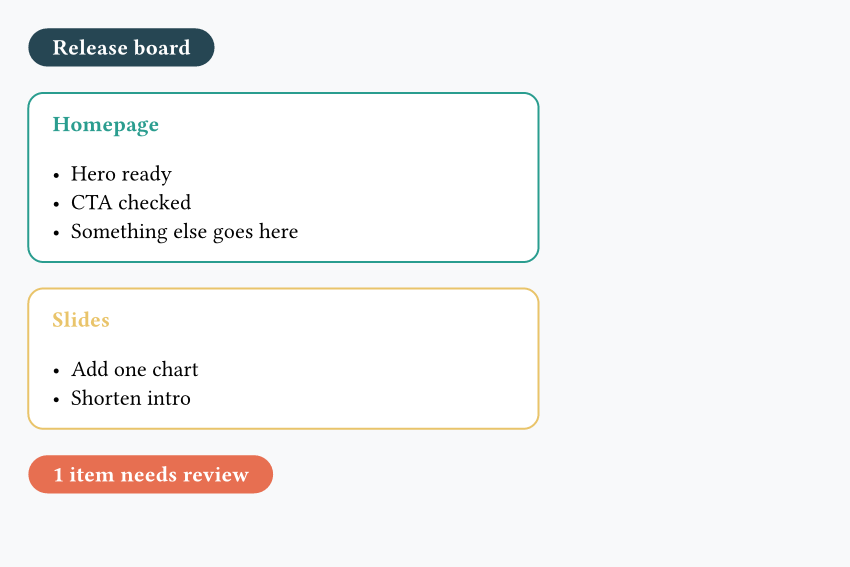
- Split the work into small reusable functions instead of writing one large block
- Use another function with
..notes, then loop over these notes to build each card
#set page(fill: rgb("#f8f9fa"), width: 15cm, height: 10cm, margin: 0.5cm)

#let banner(label, fill) = {
  rect(
    fill: fill,
    radius: 999pt,
    inset: (x: 12pt, y: 6pt),
    text(weight: "bold", fill: white, label),
  )
}

#let note-list(..notes) = {
  for note in notes.pos() {
    [- #note \ ]
  }
}

#let task-card(title, color, ..notes) = {
  rect(fill: white, stroke: color, radius: 8pt, inset: 12pt, width: 9cm, [
    #text(weight: "bold", fill: color, title)
    #v(0.15cm)
    #note-list(..notes)
  ])
}

#banner("Release board", rgb("#264653"))
#task-card(
  "Homepage",
  rgb("#2a9d8f"),
  "Hero ready",
  "CTA checked",
  "Add final screenshot",
)
#task-card("Slides", rgb("#e9c46a"), "Add one chart", "Shorten intro")
#banner("1 item needs review", rgb("#e76f51"))
2 - Color headings with show

- Use
#show heading.where(level: 1): ... - Then add another show rule for
level: 2 - Inside each show rule, apply a
set text(...)
3 - Turn headings into section cards
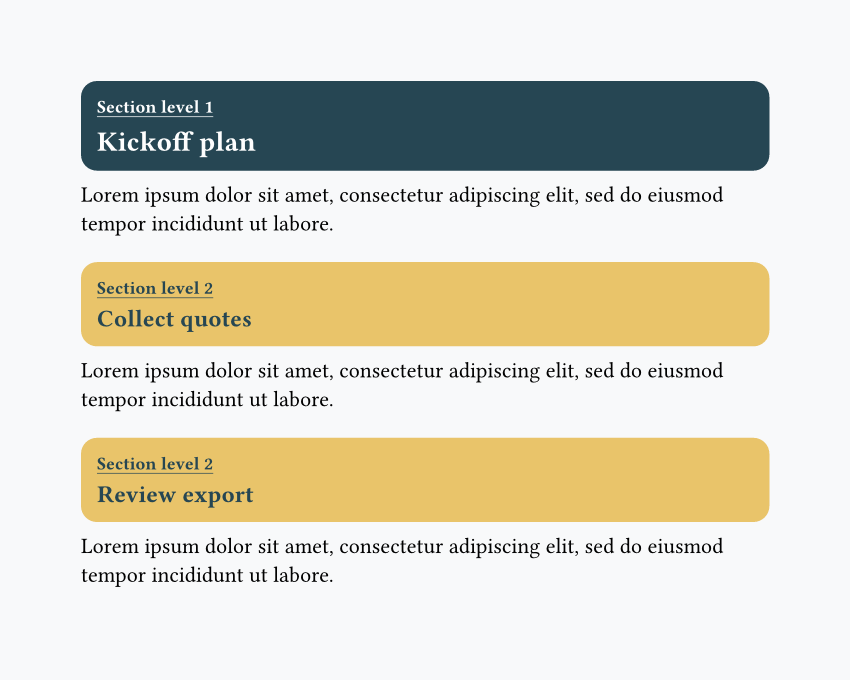
- Write a
#show heading: it => ...rule - Use
it.bodyandit.level - Use an
if/elseto change the card colors depending on the heading level - Wrap each transformed heading in a full-width rounded
rect(...) - Tip: use
#lorem(15)to generate 15 random Lorem Ipsum words.
#set page(fill: rgb("#f8f9fa"), width: 15cm, height: 13cm)

#show heading: it => {
let fill = if it.level == 1 { rgb("#264653") } else { rgb("#e9c46a") }
let ink = if it.level == 1 { white } else { rgb("#264653") }
let line-fill = if it.level == 1 { white } else { rgb("#264653") }
let heading-size = if it.level == 1 { 14pt } else { 12pt }

    rect(fill: fill, radius: 8pt, inset: (x: 8pt, y: 10pt), width: 100%, [
      #underline(text(size: 9pt, fill: ink)[Section level #it.level], offset: 2pt)\
      #text(size: heading-size, weight: "bold", fill: ink)[#it.body]
    ])

}

= Kickoff plan
#lorem(15)

== Collect quotes
#lorem(15)

== Review export
#lorem(15)
Question
Having questions? Feedback? Feel free to ask!